Video editing tools could always beautify your personal videos before you uploading to websites for sharing. There are many of these programs that can be found, such as YouTube video editor, iMovie, etc., as have mentioned before. This article would introduce some other free video editors for readers’ reference.
1. YouTube video editor
As the largest video sharing hub in the world, YouTube offer users an easy way to edit the videos they’ve uploaded to the YouTube website. Some of the basic video editing effects and also some new features exist as face blurring, 3D, etc. YouTube Video editor absolutely make your video editing and sharing effortlessly.
2. Windows Movie Maker
This free movie maker for editing videos by Microsoft has been discussed before in my previous blogs. In windows XP OS PC, you can make your own videos, and then edit the picture, audio effects for better viewing. Microsoft has many add-ons for this movie maker. Updates are available in the official Microsoft website.
3.Wax
Wax is definitely a good choice as a high performance and flexible video compositing and special effects software, whether for personal use or for business use. You can compose your dream video sequence with ease by using this tool. Being used as either a stand-alone video editor or as a plugin to other video editor, it would always perform well. It supports many video formats and also can create 3D viewing mode. It’s perfect for both beginners and professional users.
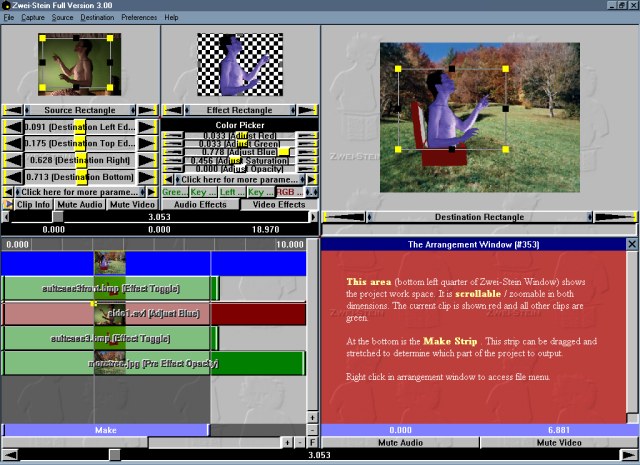
4. Zwei-Stein
Well, this is free for personal use. With a technical interface, this full featured editor can edit up to 256 video, audio, and still image clips, each with up to 64 effects chained serially. Cropping, panning and custom effects are easy with automatic key frames.
5. ZS4 Video Editor
As the new incarnation of Zwei-Stein, ZS4 Video Editor is advanced video editng and compositing toll with over 150 built-in video effects.
Many other video editors like Avid FreeDV which supports both Mac and Windows. This solid video software provides basic video and audio editing capabilities, as well as up to two streams of real-time effects. But it is not available any more.
Maybe you can choose one that is suitable for your video sharing needs. Although people do think that free ware like Windows movie maker just change videos slightly. After all, they’ll make your videos full of fun with some basic effects for free.
This blog shares videos and video information, helps you edit, perfect and share your videos.
Showing posts with label windows movie maker. Show all posts
Tuesday, August 21, 2012
Monday, July 23, 2012
8 Steps to DIY Your Greeting Cards
If you're looking to create a more personal greeting card and the thought of glue sticks and glitter scares you, try your hand at a video card. With Windows Live Movie Maker—which you can download for free here—you can create and share a great-looking video card out of your favorite photos in just a few simple steps.
You can make cards for birthdays, to share vacation pics, or to say “thank you.” Then take advantage of the easy-to-use tools that make it a snap to edit, add transitions, and music. When you're done, upload it straight to Windows Live SkyDrive, YouTube, or Facebook. Sound good? Let's get started!
1. Open Windows Live Movie Maker
Open Windows Live Movie Maker by clicking the Start button Picture of the Start button, typing Movie Maker into the search box, and then selecting it from the list of results.
Tip: If you've already been editing those photos and still have Windows Live Photo Gallery open, here's a shortcut: Select the images you want to use, click the Create tab, and then click Movie. (You can skip the next step.)
2. Add your photos
Now, it's time to add the photos you want to share. Just click the white box on the right where it says Click here to browse for videos and photos. Select all your files by holding down the Ctrl key and pressing A, or select just certain files by holding down the Ctrl key while clicking the photos and videos you want to include. Or just drag your photos into the box. When you've selected the images you want, click OK.
3. Add a title slide
In the Home tab, click Title to add a title slide to your video card. Name your card whatever you want. Get creative!
4. Get it all in order
Now that your title and credit slides have been added, it's time to make sure everything is in the right order. Move the title slide to the very beginning of the movie and the credit slide to the end (if it's not already there) by dragging it to the right place. This will frame up the beginning and end of your video card. And if you want your photos to appear in a particular order, you can arrange them in the same way.
5. Choose a theme and add music
Be sure to take advantage of the Windows Live Movie Maker AutoMovie themes, which automatically build in fun visual effects and transitions. To change your theme, navigate to the Home tab and select a different theme in the AutoMovie theme section. (Hover over a theme for a preview.) After you click a new theme, you'll be prompted to add music.
Tip: As you play around with themes, you may notice that a black screen or extra title screen sometimes appears in your picture sequence. Go ahead and delete any slides you don't want.
6. Include additional captions for each photo
Adding text to your video card is a snap (and you don't have to worry about penmanship). Click the photo you want to add text to, and then click Caption on the Home tab. You'll see a text box appear on the photo—just type in your caption. Then, if you want, you can change your font style, adjust size and color, and move the text box.
7. Don't forget credits!
Rolling credits can put the finishing touches on your card—so if you want credits to appear, make sure you choose a theme that includes them. Then, simply double-click the little pink box that appears under each credit slide and fill out the text box that appears in the picture.
8. Easily share your video card
You're done—that was easy, right? Sharing your video is just as simple. To upload to sites like Facebook, Windows Live SkyDrive, and YouTube, just click the appropriate icon in the Share group on the Home tab, and then follow the instructions. To burn your masterpiece onto a DVD that you can send in the mail, click Save movie, and then Burn a DVD.
So there you have it: a fun, digital alternative to the traditional greeting card.
From windows.microsoft
You can make cards for birthdays, to share vacation pics, or to say “thank you.” Then take advantage of the easy-to-use tools that make it a snap to edit, add transitions, and music. When you're done, upload it straight to Windows Live SkyDrive, YouTube, or Facebook. Sound good? Let's get started!
1. Open Windows Live Movie Maker
Open Windows Live Movie Maker by clicking the Start button Picture of the Start button, typing Movie Maker into the search box, and then selecting it from the list of results.
Tip: If you've already been editing those photos and still have Windows Live Photo Gallery open, here's a shortcut: Select the images you want to use, click the Create tab, and then click Movie. (You can skip the next step.)
2. Add your photos
Now, it's time to add the photos you want to share. Just click the white box on the right where it says Click here to browse for videos and photos. Select all your files by holding down the Ctrl key and pressing A, or select just certain files by holding down the Ctrl key while clicking the photos and videos you want to include. Or just drag your photos into the box. When you've selected the images you want, click OK.
3. Add a title slide
In the Home tab, click Title to add a title slide to your video card. Name your card whatever you want. Get creative!
4. Get it all in order
Now that your title and credit slides have been added, it's time to make sure everything is in the right order. Move the title slide to the very beginning of the movie and the credit slide to the end (if it's not already there) by dragging it to the right place. This will frame up the beginning and end of your video card. And if you want your photos to appear in a particular order, you can arrange them in the same way.
5. Choose a theme and add music
Be sure to take advantage of the Windows Live Movie Maker AutoMovie themes, which automatically build in fun visual effects and transitions. To change your theme, navigate to the Home tab and select a different theme in the AutoMovie theme section. (Hover over a theme for a preview.) After you click a new theme, you'll be prompted to add music.
Tip: As you play around with themes, you may notice that a black screen or extra title screen sometimes appears in your picture sequence. Go ahead and delete any slides you don't want.
6. Include additional captions for each photo
Adding text to your video card is a snap (and you don't have to worry about penmanship). Click the photo you want to add text to, and then click Caption on the Home tab. You'll see a text box appear on the photo—just type in your caption. Then, if you want, you can change your font style, adjust size and color, and move the text box.
7. Don't forget credits!
Rolling credits can put the finishing touches on your card—so if you want credits to appear, make sure you choose a theme that includes them. Then, simply double-click the little pink box that appears under each credit slide and fill out the text box that appears in the picture.
8. Easily share your video card
You're done—that was easy, right? Sharing your video is just as simple. To upload to sites like Facebook, Windows Live SkyDrive, and YouTube, just click the appropriate icon in the Share group on the Home tab, and then follow the instructions. To burn your masterpiece onto a DVD that you can send in the mail, click Save movie, and then Burn a DVD.
So there you have it: a fun, digital alternative to the traditional greeting card.
From windows.microsoft
Thursday, July 19, 2012
Video Sharing by Windows Movie Maker
- To publish and burn a movie to a DVD
- Insert a blank recordable or rewritable DVD into your DVD burner.
- Open a project in Windows Movie Maker.
- Click File, and then click Publish Movie.
- Click DVD, and then click Next. Windows DVD Maker opens.
- Complete the steps to create a DVD using Windows DVD Maker.
To publish and burn a movie to a recordable CD
- Insert a blank recordable CD or a rewriteable CD into your CD burner.
- Click File, and then click Publish Movie.
- Click Recordable CD, and then click Next.
- In the File name box, type a name for your movie.
- In the CD Name box, type a name for the CD, and then click Next.
- Choose the settings you want to use to publish your movie, and then click Publish.
- To publish and burn the movie to another recordable CD, select the Publish this movie to another recordable CD check box, and then click Next. Replace the recordable CD with another recordable CD, and then repeat steps 4 through 6.
Wednesday, July 18, 2012
How to Copy Your Custom Setting in Windows Movie Maker
Before this we've talked about how to do custom setting in Windows Movie Maker. And after you've made your own settings, you can follow the steps below to save it:
1.Click the Start button, and then click Computer.
2.In Computer, navigate to the following folder location::\Program Files\Movie Maker\Shared
where SystemDrive is the drive letter on which Windows Vista is installed.
3.Click Organize, and then click New Folder.
4.If a Destination Folder Access Denied dialog displays, click Continue.
5.In the User Account Control dialog box, click Continue.
6.Type Profiles for the folder name, and then press ENTER.
7.If another Destination Folder Access Denied dialog box displays, click Continue.
8.In the resulting User Account Control dialog box, click Continue.
9.In Computer, navigate to your Documents folder where you saved the custom setting, click the custom setting file (which has a .prx file name extension), click Organize, and then click Copy.
10.Navigate to the following folder::\Program Files\Movie Maker\Shared\Profiles.
11. Click Organize, and then click Paste.
12. If another Destination Folder Access Denied dialog box displays, click Continue.
13.In the User Account Control dialog box, click Continue.
From windows.microsoft
- In Windows Media Profile Editor, click Save and Close.
- Click the File name box, and then type a file name.
- Navigate to the Documents folder.
- Click Save.
1.Click the Start button, and then click Computer.
2.In Computer, navigate to the following folder location:
3.Click Organize, and then click New Folder.
4.If a Destination Folder Access Denied dialog displays, click Continue.
5.In the User Account Control dialog box, click Continue.
6.Type Profiles for the folder name, and then press ENTER.
7.If another Destination Folder Access Denied dialog box displays, click Continue.
8.In the resulting User Account Control dialog box, click Continue.
9.In Computer, navigate to your Documents folder where you saved the custom setting, click the custom setting file (which has a .prx file name extension), click Organize, and then click Copy.
10.Navigate to the following folder:
11. Click Organize, and then click Paste.
12. If another Destination Folder Access Denied dialog box displays, click Continue.
13.In the User Account Control dialog box, click Continue.
Tuesday, July 17, 2012
How to Create Custom Settings in Windows Movie Maker
- In Windows Media Profile Editor, click the Name box, and then type a name for your custom setting.
- This setting name appears in the More settings box in Publish Movie.
- Select the Audio check box, and then click either CBR or Quality VBR from the drop-down box.
- In the Codec box for audio, click Windows Media Audio 9.x.
- Select the Video check box, and then click either CBR or Quality VBR from the drop-down box.
- In the Codec box for video, click Windows Media Video 9.
- Some codecs might not be supported in Windows Movie Maker.
- If necessary, clear the Allow interlace processing and Allow nonsquare pixel output check boxes.
- In the Target bit rate area, click Add. In the resulting Bit rate box, type a value for the bit rate followed by K for kilobits or M for megabits, and then click OK.
- The number you enter is the total bit rate. If you are creating a quality-based VBR setting, you will not be prompted to type a bit rate.
- On the new tab that displays, click the Video size box, and then enter a display size (width x height) for your video.
Monday, July 16, 2012
Customized Movie Settings for Windows Movie Maker
Windows Movie Maker has many settings that you can choose to use when publishing your movie. However, you can also create your own custom settings to use when publishing your movie. The settings you choose when publishing a movie determine the quality and size of the final published movie file.
To create a custom setting, you must first install Windows Media Profile Editor, which is installed with Windows Media Encoder 9 Series. You can download and install Windows Media Encoder 9 Series from the Microsoft website.
The following list contains tips for creating valid custom settings by using Windows Media Profile Editor. By following these tips, you can ensure that the custom setting that you create is valid and usable in Windows Movie Maker.
Only choose CBR or Quality VBR encoding modes in Windows Media Profile Editor. Windows Movie Maker supports constant bit rate (CBR) or quality-based variable bit rate (Quality VBR) encoding modes only. Therefore, when creating custom settings for Windows Movie Maker, you must choose one of these two encoding modes. Two-pass encoding cannot be used in Windows Movie Maker. For detail information about encoding modes, see Windows Media Profile Editor Help.
Make sure that the custom setting contains one audio stream or one audio stream and one video stream. In Windows Movie Maker, a custom setting must contain either one audio stream or one audio stream and one video stream. Custom settings that contain only a video stream with no audio stream cannot be used in Windows Movie Maker.
Clear the Script check box in Windows Media Profile Editor. Windows Movie Maker supports audio and video streams only. Other types of streams, such as scripts, are not supported in Windows Movie Maker. To ensure that you can use your custom setting in Windows Movie Maker, make sure that the Script check box is cleared when you save your custom setting in Windows Media Profile Editor.
Clear the Same as video input check box in Windows Media Profile Editor. To ensure that you can use your custom setting in Windows Movie Maker, clear the Same as video input check box on the bit rate tab in Windows Media Profile Editor.
The audio stream cannot contain more than two audio channels. Custom settings that contain audio streams with more than two channels cannot be used in Windows Movie Maker.
from windows.microsoft
To create a custom setting, you must first install Windows Media Profile Editor, which is installed with Windows Media Encoder 9 Series. You can download and install Windows Media Encoder 9 Series from the Microsoft website.
The following list contains tips for creating valid custom settings by using Windows Media Profile Editor. By following these tips, you can ensure that the custom setting that you create is valid and usable in Windows Movie Maker.
Only choose CBR or Quality VBR encoding modes in Windows Media Profile Editor. Windows Movie Maker supports constant bit rate (CBR) or quality-based variable bit rate (Quality VBR) encoding modes only. Therefore, when creating custom settings for Windows Movie Maker, you must choose one of these two encoding modes. Two-pass encoding cannot be used in Windows Movie Maker. For detail information about encoding modes, see Windows Media Profile Editor Help.
Make sure that the custom setting contains one audio stream or one audio stream and one video stream. In Windows Movie Maker, a custom setting must contain either one audio stream or one audio stream and one video stream. Custom settings that contain only a video stream with no audio stream cannot be used in Windows Movie Maker.
Clear the Script check box in Windows Media Profile Editor. Windows Movie Maker supports audio and video streams only. Other types of streams, such as scripts, are not supported in Windows Movie Maker. To ensure that you can use your custom setting in Windows Movie Maker, make sure that the Script check box is cleared when you save your custom setting in Windows Media Profile Editor.
Clear the Same as video input check box in Windows Media Profile Editor. To ensure that you can use your custom setting in Windows Movie Maker, clear the Same as video input check box on the bit rate tab in Windows Media Profile Editor.
The audio stream cannot contain more than two audio channels. Custom settings that contain audio streams with more than two channels cannot be used in Windows Movie Maker.
from windows.microsoft
Thursday, July 5, 2012
Edit Videos with Windows Movie Maker
Windows Movie Maker is a feature of Windows Vista
that enables you to create home movies and slide shows on your
computer, complete with professional-looking titles, transitions,
effects, music, and even narration. And when you’re ready, you can use Windows Movie Maker to publish your movie and share it with your friends and family.
If you’re new to digital video editing or just new to Windows Movie Maker, keep reading for an introduction to the different tools you'll use in Windows Movie Maker and for links to help you learn more.
Windows Movie Maker is divided into three main areas: the panes, the storyboard/timeline, and the preview monitor.
Wednesday, July 4, 2012
Windows Movie Maker Tutorial
From youtube
Monday, July 2, 2012
Video Editor-Windows Movie Maker Version History
Windows Me
The first release was included with Windows Me in 2000, but it was not available in Windows 2000, which was released in the same year as Me (2000). Version 1.1 was included in XP in 2001.
Windows 2000
While Windows 2000 does not come with Windows Movie Maker, it is still possible run the Windows Me version of Movie Maker on Windows 2000. If the Movie Maker program files are copied from Windows Me and transferred to Windows 2000, the application will run perfectly. This can also be done with version 1.1.
Windows XP
Version 1.1 was included in Windows XP a year later, and included support for creating DV AVI and WMV 8 files. Version 2.0 was released as a free update in November 2002, and added a number of new features. Version 2.1, a minor update, is included in Windows XP Service Pack 2. Windows XP Media Center Edition 2005 introduced a new version of Windows Movie Maker, 2.5, with more transitions and support for DVD burning.
Windows Vista
A WPF version was included in some builds of Windows "Longhorn" (now Windows Vista), but was removed in the development reset.
Version 6.0 of Windows Movie Maker in Windows Vista includes new effects and transitions, and support for the DVR-MS file format that Windows Media Center records television in. The HD version in Premium and Ultimate editions of Windows Vista adds support for capturing from HDV camcorders. The capture wizard will create DVR-MS type files from HDV tapes. However, the Windows Vista version of Windows Movie Maker no longer supports importing video from an analog video source such as an analog camcorder, VCR or from a webcam.
Some systems might not be able to run the new version of Windows Movie Maker. Therefore, Microsoft has also released an updated older version 2.6 for Windows Vista on the Microsoft Download Center. This version includes the old effects and transitions, and is basically the same as Windows Movie Maker 2.1, but without the ability to capture video. Installation requires Windows Vista and is only intended for use on computers where the hardware accelerated version cannot be run.
Windows 7
In Windows 7, the latest iteration of Windows, Windows Movie Maker is no longer included in favor of its counterpart Windows Live Movie Maker, which is based on a different code base and has different functionalities. It is offered as a free download within the Windows Live suite. However, Windows Movie Maker 6.0 files can be copied over and run from a Windows Vista installation to Windows 7.
This method works for all versions of Windows Movie Maker, including the DirectX version if a computer's hardware supports it. Windows Movie Maker 2.6 can be freely downloaded and is also Windows 7 compatible. Windows Movie Maker 2.1 also works on Windows 7 if all of the program files are copied over from a Windows XP computer.And so long as Windows Movie Maker 2.6 is also installed. This is because Windows Movie Maker 2.1 runs off of some of the dill files of Movie Maker 2.6. Therefore Movie Maker 2.6 must also be installed on Windows 7 in order for Movie Maker 2.1 to work.
Windows 8
All of the versions of Windows Movie Maker work on Windows 8. Windows Movie Maker 2.1 and Windows Movie Maker 6 also works on Windows 8 if all of the Movie Maker program files are copied over from a Windows XP and Windows Vista computer. Windows Movie Maker 2.6 can be downloaded from the Microsoft website and also works on Windows 8.
From wikipedia
The first release was included with Windows Me in 2000, but it was not available in Windows 2000, which was released in the same year as Me (2000). Version 1.1 was included in XP in 2001.
Windows 2000
While Windows 2000 does not come with Windows Movie Maker, it is still possible run the Windows Me version of Movie Maker on Windows 2000. If the Movie Maker program files are copied from Windows Me and transferred to Windows 2000, the application will run perfectly. This can also be done with version 1.1.
Windows XP
Version 1.1 was included in Windows XP a year later, and included support for creating DV AVI and WMV 8 files. Version 2.0 was released as a free update in November 2002, and added a number of new features. Version 2.1, a minor update, is included in Windows XP Service Pack 2. Windows XP Media Center Edition 2005 introduced a new version of Windows Movie Maker, 2.5, with more transitions and support for DVD burning.
Windows Vista
A WPF version was included in some builds of Windows "Longhorn" (now Windows Vista), but was removed in the development reset.
Version 6.0 of Windows Movie Maker in Windows Vista includes new effects and transitions, and support for the DVR-MS file format that Windows Media Center records television in. The HD version in Premium and Ultimate editions of Windows Vista adds support for capturing from HDV camcorders. The capture wizard will create DVR-MS type files from HDV tapes. However, the Windows Vista version of Windows Movie Maker no longer supports importing video from an analog video source such as an analog camcorder, VCR or from a webcam.
Some systems might not be able to run the new version of Windows Movie Maker. Therefore, Microsoft has also released an updated older version 2.6 for Windows Vista on the Microsoft Download Center. This version includes the old effects and transitions, and is basically the same as Windows Movie Maker 2.1, but without the ability to capture video. Installation requires Windows Vista and is only intended for use on computers where the hardware accelerated version cannot be run.
Windows 7
In Windows 7, the latest iteration of Windows, Windows Movie Maker is no longer included in favor of its counterpart Windows Live Movie Maker, which is based on a different code base and has different functionalities. It is offered as a free download within the Windows Live suite. However, Windows Movie Maker 6.0 files can be copied over and run from a Windows Vista installation to Windows 7.
This method works for all versions of Windows Movie Maker, including the DirectX version if a computer's hardware supports it. Windows Movie Maker 2.6 can be freely downloaded and is also Windows 7 compatible. Windows Movie Maker 2.1 also works on Windows 7 if all of the program files are copied over from a Windows XP computer.And so long as Windows Movie Maker 2.6 is also installed. This is because Windows Movie Maker 2.1 runs off of some of the dill files of Movie Maker 2.6. Therefore Movie Maker 2.6 must also be installed on Windows 7 in order for Movie Maker 2.1 to work.
Windows 8
All of the versions of Windows Movie Maker work on Windows 8. Windows Movie Maker 2.1 and Windows Movie Maker 6 also works on Windows 8 if all of the Movie Maker program files are copied over from a Windows XP and Windows Vista computer. Windows Movie Maker 2.6 can be downloaded from the Microsoft website and also works on Windows 8.
From wikipedia
Video Editing-Windows Live Movie Maker
Windows Live Movie Maker (codename Sundance) is a video creating/editing software that is a part of Microsoft's Windows Live initiative. It is intended to replace Windows Movie Maker that is currently included in Windows Vista. Windows Live Movie Maker is not compatible with versions of Microsoft Windows prior to Windows Vista.
Windows Live Movie Maker is a complete rewrite of the Windows Movie Maker application. Focusing on the needs of general users, the streamlined design consists largely in the reduction of features considered unimportant to general users.The program includes a redesigned ribbon interface.
Windows Live Movie Maker allows users to publish videos to SkyDrive, Facebook, YouTube, and Flickr, as well creating HD videos.
History
Four new animated video titles included in Windows Live Movie Maker 2011 (Wave 4).
Version 2009 (Wave 3)
The application was first released in beta form as part of Wave 3 of the Windows Live suite of products on September 17, 2008 in Windows Live Essentials 2009,[2] and the final version was officially released on August 19, 2009.
Version 2011 (Wave 4)
On June 24, 2010, the beta version of Windows Live Movie Maker 2011 (Wave 4) was released to the public as part of Windows Live Essentials 2011 beta, and shortly after on August 17, 2010, a beta refresh version was released to the public. With the 2011 release, users must install Windows Live Photo Gallery when installing Windows Live Movie Maker, and vice versa. The new version includes the ability to record video clips from a Webcam, as well as inclusion of new animated video titles. The final version of Windows Live Movie Maker 2011 was released with the final version of Windows Live Essentials 2011 on September 30, 2010. Windows Live Movie Maker 2011 also reintroduces the ability (which was missing from the previous version of Movie Maker) to add files to your project that are stored on network devices, such as servers.
From wikipedia
Windows Live Movie Maker is a complete rewrite of the Windows Movie Maker application. Focusing on the needs of general users, the streamlined design consists largely in the reduction of features considered unimportant to general users.The program includes a redesigned ribbon interface.
Windows Live Movie Maker allows users to publish videos to SkyDrive, Facebook, YouTube, and Flickr, as well creating HD videos.
History
Four new animated video titles included in Windows Live Movie Maker 2011 (Wave 4).
Version 2009 (Wave 3)
The application was first released in beta form as part of Wave 3 of the Windows Live suite of products on September 17, 2008 in Windows Live Essentials 2009,[2] and the final version was officially released on August 19, 2009.
Version 2011 (Wave 4)
On June 24, 2010, the beta version of Windows Live Movie Maker 2011 (Wave 4) was released to the public as part of Windows Live Essentials 2011 beta, and shortly after on August 17, 2010, a beta refresh version was released to the public. With the 2011 release, users must install Windows Live Photo Gallery when installing Windows Live Movie Maker, and vice versa. The new version includes the ability to record video clips from a Webcam, as well as inclusion of new animated video titles. The final version of Windows Live Movie Maker 2011 was released with the final version of Windows Live Essentials 2011 on September 30, 2010. Windows Live Movie Maker 2011 also reintroduces the ability (which was missing from the previous version of Movie Maker) to add files to your project that are stored on network devices, such as servers.
From wikipedia
Subscribe to:
Posts (Atom)